You just put the last six and a half hours of work into finishing your client’s chest piece. Every line you pulled is solid and crisp. Your color saturation is on point. This tattoo is one for the portfolio, and it’s getting ready to walk out the door. The last thing you want is a rushed photo that turns out blurrier than Bigfoot or has a blinding glare in it. There are some Do’s and Don’ts when it comes to getting a clear shot of that clean tattoo, and here are a few of them:
DO:
Do The 4 W’s: Witch Hazel, Wrap it Up, Wait, and Wipe it Down
This post-tattoo ritual that will reduce redness and glare pre-photo: Spray a healthy amount of Witch Hazel (or Bactine) on the tattoo, wrap it, kill about 10-15 minutes by having your client get up and look in the mirror, then remove your wrapping, wipe it down, pull your gloves off, and get your pic.
Get a Lamp with a Diffuser (or Rig One Up Yourself)
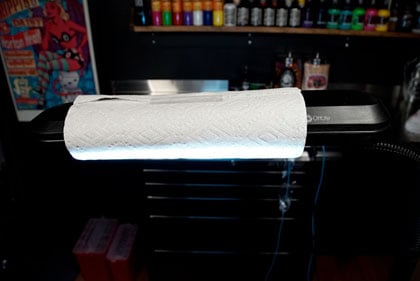
A good lamp is going to go a long way in getting rid of graininess and glare. There are all kinds of higher-end lamps on the market that have built in diffusers, which helps soften the light that’s hitting the glossy surface of that fresh tattoo, but if you don’t have one, don’t stress; you can make one of your own pretty easily!


You’ll be using some stuff that’s readily available to you: a paper towel, someone to hold it up, or some tape/rubber bands. Have your buddy hold the paper towel underneath the bulb in your lamp, or tape it up so that it’s secure. You can also use tracing paper instead of paper towels if that’s easier for you.
Use Natural Lighting
If the sun is out when that tattoo is done, open up the blinds! You can’t beat natural lighting when it comes to getting a bright, clear photo without throwing off your colors. You’ll get yourself some much needed Vitamin D in the process, so everyone wins here!
Hold Still
The less shaky you are, the less likely you are to get a blurry photo. There are a few ways to help you get a stable shot: while holding your phone/camera, tuck your elbows in at your sides and keep them tense (almost like T-Rex arms), lean up against a wall or rest your arms on a table as you take your pic, or use a tripod. Hit up Amazon and you’ll find several tripods/mounts that are made for smart phones.
Take Multiple Shots
You might have nailed it on your first shot, but it’s best to get a bunch of pics while you can. Change up your distance. Experiment with different lighting. Get shots at different angles. The more photos you take, the more likely you are to find one that’s portfolio-worthy.
Keep it Centered
There are plenty of instances where you’ll want to have your subject on the left or right third of the photo, but your finished tattoo is not one of them. Use the grid to keep your tattoo dead center in the shot. This will fill your image with exactly what people are coming to see - your work.
Use a Solid Background
The more that you have going on behind and around the subject of your photo, the more distracting it is. Instead of having your client stand in front of your workstation that’s covered in stickers, have them rest their arm/leg on a lap cloth, or stand in front of a solid colored wall. This keeps the viewers attention right where you want it to be.
DON’T:
Don’t Use Filters
It might be tempting, but filters are only going to throw your colors off and make your viewers question what they’re looking at. The only exception to this one is a black and white filter on a Blackwork/Black-and-Gray tattoo, but we’ll always recommend that you go filterless in all of your shots.
Don’t Get Too Close
Unless you’ve got a macro lens, you’re only going to get a blurry photo if you’re taking it too close. Back up a bit and you’ll get an in-focus shot. If you were standing up close to try to cut something out of the shot, take a step back, get your pic, and crop the photo afterward.
Don’t Use Your Flash
You might think that your camera’s flash should be your go-to, but it really should be an absolute last resort. Flash is pretty much guaranteed to give you more glare and wash out the colors in your tattoo. Leave it off and replace it with a good lamp or natural lighting.
Don’t Rely on Your Client to Send You a Usable Shot
We definitely recommend getting a healed shot from your client somewhere down the road, but don’t count on them to get you the only decent photo of your work. Aside from the possibility that the client may not be a very good photographer, he/she may not have followed the proper aftercare steps, resulting in a tattoo that doesn’t match the work that was put into it.


